MDWIX Academy, a learning centre committed to incorporate digital ideas everyday.

Showing posts with label How-To. Show all posts

Wednesday, April 24, 2024

How to Work With Settings Function? MDWIX Blogger Support-Step by Step Guide.

Use of Settings Function in Blogger dashboard-Step by Step Guide.


MDWIX

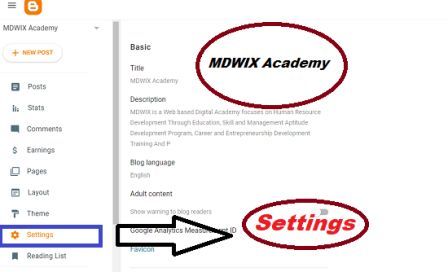
The settings function in blogger dashboard allows you to customize various aspects of your blog, such as the title, description, language, privacy, comments, and more. To access the settings function, you need to log in to your blogger account and click on the name of your blog. Then, you will see a menu on the left side of the screen with different options. Click on the one that says "Settings" and you will see a new page with several tabs.


The first tab is "Basic", where you can edit the basic information of your blog, such as the title, description, blog address, HTTPS availability, and author profile. You can also delete your blog from this tab if you want to. To make any changes, just click on the edit link next to each option and save your changes when you are done.


The second tab is "Posts, comments and sharing", where you can configure how many posts you want to show on your home page, how you want to format the date and time of your posts, how you want to handle comments, and how you want to enable sharing options for your posts. You can also enable or disable email notifications for comments and moderate comments before they are published. To make any changes, just click on the edit link next to each option and save your changes when you are done.


The third tab is "Email", where you can set up an email address to post to your blog via email. You can also choose who can see your email posts and whether you want to publish them immediately or save them as drafts. To make any changes, just click on the edit link next to each option and save your changes when you are done.


The fourth tab is "Language and formatting", where you can select the language of your blog, the time zone, the date and time format, and the transliteration option. You can also enable or disable Google Translate widget for your blog. To make any changes, just click on the edit link next to each option and save your changes when you are done.


The fifth tab is "Search preferences", where you can optimize your blog for search engines by adding meta tags, custom robots header tags, custom robots.txt, custom redirects, and Google Analytics tracking ID. You can also enable or disable adult content warning for your blog. To make any changes, just click on the edit link next to each option and save your changes when you are done.


The sixth tab is "Other", where you can import or export your blog content, back up or restore your blog template, enable or disable site feed, and manage user permissions for your blog. You can also delete all comments from this tab if you want to. To make any changes, just click on the edit link next to each option and save your changes when you are done.


The seventh tab is "User settings", where you can edit your personal information, such as your display name, profile photo, email address, password, language preference, and privacy settings. You can also sign out from this tab if you want to. To make any changes, just click on the edit link next to each option and save your changes when you are done.


These are the main functions of the settings function in blogger dashboard. By using them wisely, you can customize your blog according to your needs and preferences. If you have any questions or problems with the settings function, you can visit the blogger help center or contact the blogger support team for assistance.

===========

Thanks for your interest to MDWIX Academy. Please visit again.

===========

Saturday, December 23, 2023

How to Start Career with Web Blogging| Free Guide to Start a Lucrative Blog| Make Money Online.

How to make your career from web blogging-Free guide "how to start blogging."


MDWIX
Dear Audiences!
On behalf of MDWIX Academy, I, Md Kamaluddin am publishing this article on blogging. We are working with google and WordPress and Wix blogging platform for the last six years. Very starting I was experimenting over the opportunity of online earning. Finally I came to this conclusion that blog or vlog can be the base of all online earning resources. Now I am going to explain it in this. First of all I am discussing some aspects of blogging. The term, "Blogging" came from the two terms, "web" and "logging". It means, "chronological writing in webpage or website.  Web blogging is a popular way to share ones thoughts, opinions, and expertise view with the online audience. There are several popular blogging sites. Take participate any of the blogging website and write some original, relevant, informative, useful, passionate contents in which you have depth of knowledge and experience. If audience can get benefit from the content, it will enhance the fan based audience. Thus you are enriched with havoc follower and effectual interaction with audiences. You primarily success to accumulate fan around your blog. Then you can approach to any kind of ad network for monetization of the contents. 

       Now we are suggesting to start with a Free Blog Account either in www.blogspot.com and associate to https://www.mdwix.org using your Gmail account or you can make your blog in https://wordpress.com. At starting choose blogger to be trained in blogging. After you choose a suitable theme and simple layout as per subject topic. After getting a strong fan base, you can add your Blog to Google Ad-sense for monetization. After getting approval for placing ad, Google will place suitable advertisements as per the contents of your blog. On basis of interaction to advertisements, earning from CPM can be credited to your AdSense account. For support anyone can Contact to MDWIX Support at ceo@mdwix.org

Visit MDWIX Academy for BLOGGING TUTORIAL AS BELOW TO BE A SMART BLOGGER.

===============================================================


Thursday, September 14, 2023

How to Work with Comments Tab in Blogger? Step by Step Tutorial.

Comments in Blogger? Beginners Support. 


MDWIX Academy.
"Comments" are a great way to interact with your readers and get feedback on your blog posts. They can also help you build a community of loyal followers and increase your blog's visibility. However, managing comments can be challenging, especially if you receive a lot of spam or unwanted messages. That's why blogger dashboard provides you with a Comments function that allows you to moderate, approve, delete, mark as spam, or reply to comments on your blog. Here's how to use it:


First-Log in to Blogger account. 

Log in to your blogger account and go to the dashboard.

Second-Viewing Comments.

On the left sidebar, click on Comments. You will see a list of all the comments on your blog, sorted by date.

Third-Detailing of Comments.

To view the details of a comment, click on the comment text. You will see the comment author, date, post title, and comment content.

Fourth-Moderate Comments.

To moderate a comment, use the buttons at the top of the comment details. You can approve, delete, mark as spam, or reply to the comment. You can also edit the comment by clicking on the pencil icon.

Fifth-Bulk Moderation. 

To moderate multiple comments at once, select the comments that you want to moderate by checking the boxes next to them. Then use the buttons at the top of the list to apply the same action to all selected comments.

Sixth-Filtering Comments. 

To filter the comments by status, use the tabs at the top of the list. You can filter by all comments, published comments, pending comments, or spam comments.

Seventh-Controlling Comment.

To change the settings for comments on your blog, click on Settings on the left sidebar, then click on Posts and Comments. Here you can change options such as who can comment on your blog, how comments are moderated, how comments are displayed, and whether you want to enable comment notifications.

            Using the Comments function in blogger dashboard can help you manage your blog comments more efficiently and effectively. It can also help you create a positive and engaging environment for your readers and yourself. Happy blogging!

================
Thanks for your interest to MDWIX Academy. Please visit again.
================

Tuesday, September 5, 2023

How to Work with Page Editor in Blogger? Step by Step Tutorial.

Pages Editor in Blogger-Step by Step Help.

MDWIX


Pages are a feature of Blogger that allow you to create static web pages for your blog. Unlike posts, which are displayed in reverse chronological order on your home page, pages are more permanent and can be accessed from a menu or a link. You can use pages to create an About Me section, a Contact Form, a Privacy Policy, or any other content that you want to display on your blog. In this guide, we will show you how to use the Pages function in Blogger dashboard step by step.


Step-1. Log in to Blogger.

Log in to your Blogger account and go to the dashboard of the blog you want to add pages to.

Step-2. Create New Page. 

On the left sidebar, click on Pages. You will see a list of existing pages, if any, and a button to create a new page.

Step-3. Link to Page Button on Header.

Click on New page and choose Blank page or From a URL. A blank page will let you create a page from scratch, while from a URL will let you import content from another web page.

Step-4. Customize Page Content.

Enter a title for your page and write or paste the content you want to display on the page. You can use the formatting tools to customize the appearance of your page, such as adding images, links, headings, lists, etc.

Step-5. Adjust of Page Function.

On the right sidebar, you can adjust the settings for your page, such as the permalink, the comments option, the search description, and the labels.

Step-6. Publishing of Page.

When you are done editing your page, click on Publish to make it live on your blog. Alternatively, you can click on Save or Preview to save it as a draft or preview it before publishing.

Step-7. View, Edit or Delete Pages.

To view your published page, go back to the Pages list and click on View under the title of your page. You can also edit or delete your page from this list by clicking on Edit or Delete under the title of your page.

You have successfully created a page for your blog using the Pages function in Blogger dashboard. You can repeat this process to create as many pages as you want for your blog.

=============
Thanks for your interest to MDWIX Academy. Please visit again.

=============

Wednesday, August 16, 2023

How to Work with Earning Tab in Blogger? Step by Step Help.

Monetization in Blogger-Step by Step Guide.


MDWIX
Google introduces an exclusive opportunity for blogger to live with passion of writing. One of the features that Blogger offers is the "Earning function". It allows you to monetize your blog with Google AdSense. In this guide, we will show you how to use the Earning function in Blogger dashboard and start earning money from your blog.


Step 1: Sign up for Google AdSense.

Before you can use the Earning function, you need to have a Google AdSense account. Google AdSense is a program that displays ads on your blog and pays you when someone clicks on them. To sign up for Google AdSense, go to https://www.google.com/adsense and follow the instructions. You will need to provide some information about your blog, such as its name, URL, language, and content type. You will also need to verify your identity and payment method.


Step 2: Enable the Earning function in Blogger dashboard.

Once you have a Google AdSense account, you can enable the Earning function in Blogger dashboard. To do this, log in to your Blogger account and go to the dashboard of the blog you want to monetize. On the left sidebar, click on "Earnings". You will see a page that shows your current earnings and some options to customize your ads. Click on the "Sign up for AdSense" button and follow the steps to link your Google AdSense account with your Blogger account.


Step 3: Choose where to display ads on your blog.

After you link your Google AdSense account with your Blogger account, you can choose where to display ads on your blog. You can choose from three options: Auto ads, Display ads, and Matched content. Auto ads are ads that are automatically placed by Google on your blog, based on your content and layout. Display ads are ads that you can manually place on specific locations on your blog, such as the header, sidebar, or footer. Matched content are ads that are related to the content of your blog posts and appear below them. You can enable or disable any of these options by toggling the switch next to them.


Step 4: Review and save your settings.

After you choose where to display ads on your blog, you can review and save your settings. You can preview how your ads will look like on your blog by clicking on the "View blog" button at the top right corner of the page. You can also adjust some settings for your ads, such as the color scheme, font size, and ad format. To save your settings, click on the "Save settings" button at the bottom of the page.


Step 5: Wait for approval and start earning money.

The last step is to wait for approval from Google AdSense and start earning money from your blog. Depending on your blog's traffic and content quality, it may take some time for Google AdSense to review and approve your site. You will receive an email notification when your site is approved. Once approved, you can start earning money from your blog whenever someone views or clicks on your ads. You can check your earnings and performance reports in both Blogger dashboard and Google AdSense dashboard.


Congratulations! You have successfully used the Earning function in Blogger dashboard and monetized your blog with Google AdSense. We hope this guide was helpful and informative for you.

===========
Thanks for Your interest to MDWIX Academy. Please Visit again.
===========

Saturday, August 5, 2023

How to Work with Posts Function in Blogger? Step by Step Tutorial.

Posts Editor in Blogger-Step by Step Support.

MDWIX

The "Posts" function is the main feature in blogger dashboard. It allows blogger to create, edit, publish and manage the blog posts. In this session we are discussing different aspects of Post function segments. So follow the guidelines step by step given bellow:

First Step: 


Log in to your blogger account with your Gmail account. Then go to the dashboard of the blog to which you want to work on.


Second Step: 


Click on the Posts tab on the left sidebar. You will see a list of your existing posts. There is also a button to create a new post.


Third Step. 


Click on the New post button at the top right corner. You will be taken to the post editor page. Here you can write your content, add images, videos, links and other features. You can also choose a title, labels, permalink and schedule for your post.


Fourth Step. 


Click on the title or the Edit link below it for editing an existing post. You will be taken to the same post editor page as above. Then you can make changes to your content and settings.

Fifth Step. 


Click on the Publish or Update button at the top right corner. here you can publish new post or update an existing post. After publishing the post will be visible on your blog and in blog's RSS feed.


Sixth Step. 


To delete or unpublish your post, click on the More options menu  next to the Publish or Update button and choose Delete or Un-publish. Your post will be removed from your blog and your RSS feed.


Seventh Step. 


To manage your posts, you can use the filters and search options at the top of the posts list. You can also select multiple posts and perform bulk actions such as publish, unpublish, delete, label or revert to draft.

Conclusion: These posts function in blogger dashboard can be used as per guidelines as discussed above. So dear friends try it on your own blog post. If you have any questions or feedback regarding to these features, please leave a comment below. You feel free to  contact us through our Contact us  page.

========================
Thanks for your interest to MDWIX Academy. Please Visit again.
================

Saturday, July 29, 2023

How to Work with Overview Function in Blogger Dashboard? Step by Step Guide.

Overview Function in Blogger-Step by Step Guide. 


Blogger Overview
The overview function in the blogger dashboard is a useful tool. It allows you to see various statistics and information about your blog. In this guide, we will show you how to use the overview function step by step.


Step-1. 

          Log in to your blogger account using your Gmail account. Then go to the dashboard page. You will see a list of your blogs on the left side of the screen.

Step-2. 

        Click on the blog that you want to view the overview for. You perhaps will see a menu with different options on the left side of the screen eg. Posts, Comments, Earnings, etc.

Step-3. 

       Click on the Overview option. You will see a summary of your blog's performance, like page views, comments, followers, etc. You can also see a graph of your page views over time. You will also find a list of your most popular posts.

Step-4. 

      Click on the Stats option on the left side menu. You will see more details about your blog's statistics. You can also see more graphs and charts which show your audiences, traffic sources, and devices.

Step-5.

      Click on the Comments option on the left side menu. You will definitely see more details of the comments that your audiences place to your blog. You can see a list of all the comments on your blog. You can moderate them by deleting, marking as spam, or publishing them.

Step-6.

               Click on the Followers option on the left side menu. You can see a list of all the people who follow your blog. You can manage them by removing or blocking them.

Step-7.

          Click on the Earnings option on the left side menu. You can see details about the blog earning. You can see how much money you have made from your blog through Google AdSense. You can set up or change your payment settings.

Conclusion: The overview function in the blogger dashboard is a simple and convenient way to monitor and manage your blog. By following these steps, you can use it to improve your blogging experience and grow your audience. Hope you get the answer as you require. Follow next post for better understanding of the blogging tips and tutorials.

===============
Thanks for your interest to MDWIX. Please visit again.
===============

Monday, July 17, 2023

How to Work With Blogger Dashboard? Tutorial Step by Step| Beginners to experts blogging guide by MDWIX Academy.

How To Use Blogger Dashboard? Best effective blogging tips for beginners to experts.


Blogger is a popular platform for creating and managing blogs. If you want to start your own blog or improve your existing one, you need to know how to use the Blogger dashboard. The dashboard is where you can access all the features and settings of your blog, such as creating posts, changing the design, adding widgets, viewing statistics, and more. In this guide, we will show you how to use the Blogger dashboard step by step, so you can make the most of your blogging experience.


To access the Blogger dashboard, you need to have a Google account and sign in to blogger.com. Once you are logged in, you will see a list of your blogs on the left side of the screen. If you have more than one blog, you can switch between them by clicking on the blog name. You can also create a new blog by clicking on the "New blog" button.


The Blogger dashboard has four main sections: Overview, Posts, Pages, and Comments. Each section has a different function and allows you to perform different tasks related to your blog. Let's take a look at each section in detail.

Go to blogger.com and sign in with Gmail address. You will see a button saying "Create New Blog", click this button and you will be redirected to blogger dashboard as shown below.


MDWIX Academy


New Post-This tab is used to create new post in blogger.

Next is "Posts", when click you will see 3 more drop down options i.e All, Draft and Published. All means your total posts. Drafts are the posts still not published and Published are the posts which are running.

"Stats" is the next option in dashboard, having more 4 drop down options i.e Overview, Posts, Traffic Sources and Audience. 

               Overview is all about page views, Post, Traffic sources & audiences.

               Page Views means how much times your page was viewed Today, Yesterday, this month and all time history. It also shows your blog Followers. 

               Posts is showing you how much times your blog posts have been viewed. 

               Traffic Sources tell about, where traffic is coming from. The last one is 

               Audience, which shows the number of Audience country wise and also differentiate between gender.

Next is "Comments". Here is also three more options i.e Published, Awaiting Moderation and Spam. Published comments are the recommended comments. Awaiting Moderation are still in reviewed. And the Spam are the comments which are not acceptable or may harm your blog or website.

"Earning", this option is available to link your blog or website to adsense for earning money from Google adsense program

"Pages"., this options is for creating new pages in your blog.

"Layout", as the word describes itself. From this option you can select different things that how your blog should be looked like.

Select Themes for your blog from the option "Theme".

Next is "Settings". It is the advance feature of blogger. It is used to SEO of the post ang page. Custom domain address assignment for blogger. All these will be discussed later gradually.

On the left hand side find the dashboard. At the Bottom you will find "View Blog", by clicking this an existing blog will be opened in new tab. 

Hope this post will be helpful. In the next post we will discuss Basic Setting of Blogger.

Thanks to visit again in MDWIX Academy.


----------------------------------------------------------------


Thursday, February 16, 2023

Best Online Jobs-Work and Earn at Home-Legitimate Methods of Web Earning for Students, Bachelor and Housewives-MDWIX Career.

Legitimate 'work at home' for online career.

Dear Audiences/friends.            

Mdwix
Experiments with some of the legitimate methods of  online earnings: If you are looking for ways to make money online or legit source of  work at home, you might have come across many websites or articles that promise easy and quick cash. However, not all of them are reliable or worth your time and effort. Some of them might even be scams or involve illegal activities. So how do you find out which method are legitimate and which ones are not? That's what I decided to do an experiments. I tried out eight different methods of online earning that are commonly recommended or advertised on the internet. According to experiment and observation there are Eight methods which are best suited for Beginners to Experts.


The essentials to start online earning. First you need a laptop, a smart phone, an email address (Preferably Gmail), a mobile contact, a valid postal address and a personal bank account. Now with your email and phone number register yourself in different website as per requirement. 

    Blogging: If you work with blogging that mean you are sharing your passion and experiences with your audiences through your blog. Then you have opportunity to place advertisements to your webpage or websites by the advertising agency like Facebook, Google and so many. You can get your revenue in your AdSense or advert account. 

   Affiliate Marketing: You can start as affiliate marketer and promoting third parties product and service through your web presence and social network or through digital marketing, then you can get affiliate commission.

   Online Selling:  It is another lucrative source of online earning. You can sell your own products in your websites or dropship another products to your webpage. Or enroll as a seller in one or more market place website like Indiamart, Amazon, etc. Choose products and place them in your store. Then you can get profit margin set by you.

   Freelancing: It is a most profitable earning resources. Sell your expert service to the online client at par the rate set by you. Just enroll yourself in different freelancing web service. Place your skill and get order for your service as per your declared cost. Learn More Here.

For  support Contact to MDWIX Bloggers at ceo@mdwix.org

Following topics as below are relevant to this post: Legitimate work from home jobs, Legitimate online part time job from home, legitimate job sites, legitimate work at home without experience, online work from home job without investment, Work at home online in India and abroad, online earn money site and App with support, online earning platform, work  online for students bachelor, housewife and tutor, make money from online in India and abroad, online work at home part time or full time for students, Earn money work from anywhere anytime. make money earn while at sleep, earn money while in dream.


Here is a list of best Jobs and Career opportunities.